Guest post by member: Liz Burgess
“I will never use cloth diapers!”
-My famous last words before switching to cloth diapers.
I had no intention of cloth diapering. It was gross and inconvenient and messy and expensive
and for yuppie moms who fed their toddlers vegan-organic-non-GMO-certified-homemade baby food
and shopped exclusively at whole foods and farmer’s markets (our closest whole foods is two hours
away!). Plus Oliver was 10 months old and we had used disposables happily all this time, why the heck
would I switch to cloth?!
Then, in the course of two weeks, DH and I got a double whammy – Oliver’s bottom suddenly
broke out in the angriest, itchiest, reddest diaper rash he’s ever got and we found ourselves between
jobs and poor. And by poor, I mean the type of poor where you’re digging in couch cushions for gas
money and trying to feed five people for a week with two boxes of expired easy mac and a dented can
of beef gravy. So we scraped and scrounged to buy the little packs of diapers in every brand imaginable,
and all the while his poor little tushy just got worse and worse. Finally we found ourselves in a pickle –
we had about 20$ left to our name and a solid three weeks before we could expect any money coming
in. Knowing we weren’t going to be able to afford disposable diapers for at least a month was scary, but
DH’s casual suggestion of “Why don’t we just use all these cloth ones people gave us when he was
born?” was even scarier.
With no other options, I put my chin up and said “How bad could they really be? If yuppie moms
can do it, so can I!” and we started this exciting (but most CERTAINLY temporary) cloth adventure. Now
I’m three months in and I would probably cry if you told me I had to use disposable diapers again!
There’s no more rashes, no more 30$ a week in the trash, no more blowouts, no more morning
surprises because Oliver has pulled off his diaper to itch during the night and ruined his brand new sheet
set! I am a happy convert to cloth diapers and DH even gets excited over the little things with me, like
colored pre-folds and new diaper covers.
So with this backstory in mind, I’ve caught you up, dear reader, with me, this morning at our local home
improvement store. I had spent all yesterday afternoon looking up diaper sprayers that hook directly to
your toilet. I was sick of the “dunk and swish” method, and DH was beginning to be “busy” a little too
much when Oliver’s diapers were dirty. So off we set to town, with every intention of returning with a
state of the art diaper sprayer made on the cheap by yours truly! When we got to the store I told the
sales lady what I was trying to do:
“I want a sprayer, like in the kitchen, that I can hook to our toilet so I can spray off cloth diapers.
Kind of like a bidet maybe?”
“Can’t be done.”
“What do you mean?”
“Well these sprayers are for sinks. You can’t hook them to a toilet. And we don’t sell bidets.”
“But don’t you have a ‘T’ or a coupler or something I could use to just put it on the hose where
the water comes in?”
“No. Sorry. You’ll have to buy a kit online. You’ll never get that to work.”
Well nerds to that. Those kits cost upwards of 50$ and I wanted the sprayer today, not next week! So I
smiled kindly, thanked her for her time, and then got the kitchen sprayer anyway, figuring I could make
it work somehow. And work does it! Holy cow this thing it awesome! It cost right around 17$, took me
about 5 minutes to install, and doubles as one of those European “bum guns” that my father-in-law has
been eyeballing online for the last few months! So take THAT sales lady, I did it and it works great!
Here’s how:
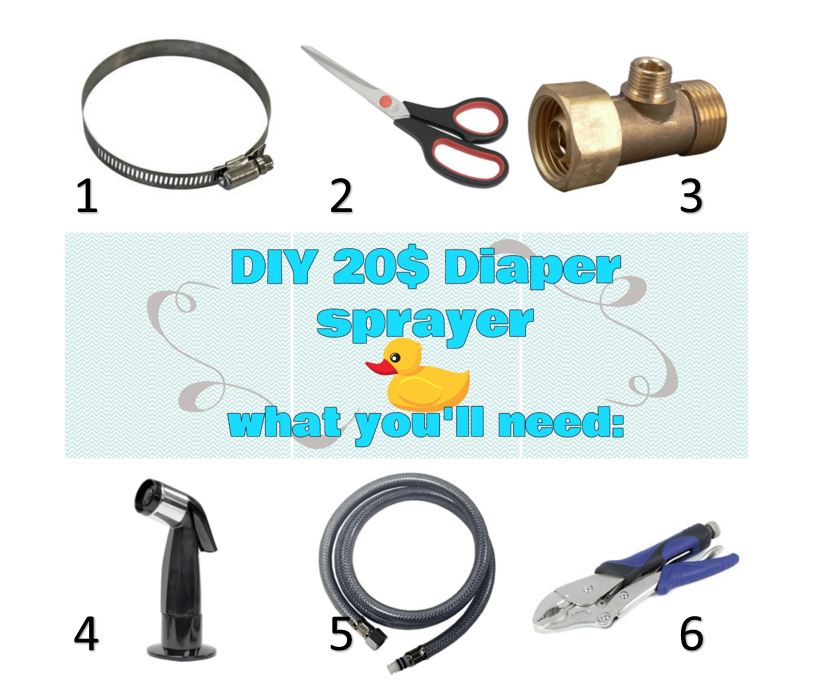
Ingredients:
1.) 1/4” to 5/8” Stainless steel adjustable clamp
2.) Scissors
3.) ADD-A-TEE Adapter with a 3/8” and 1/4” Output
4.) Sprayer Head
5.) Sprayer Vinyl Hose
6.) Pliers
Now first things first, make sure you shut off your water to the back of your toilet, it’ll be the little knob
down by the bottom. This is a very important step if you don’t want to be covered in water as you start
unscrewing plumbing lines! Then I would recommend laying down a towel or something absorbent,
because there will be a little water in the lines no matter what you do and it’ll get all over the floor if you don’t!
Now for the actual assembly! This seems way more complicated than it actually is, I promise!
Start by putting together the Sprayer head and the Sprayer Hose (sometimes these are sold put together
already, if so, great! But ours didn’t happen to be) as per the directions included in the box. Then, using
the scissors, cut off the tip off the end opposite the sprayer, like this:
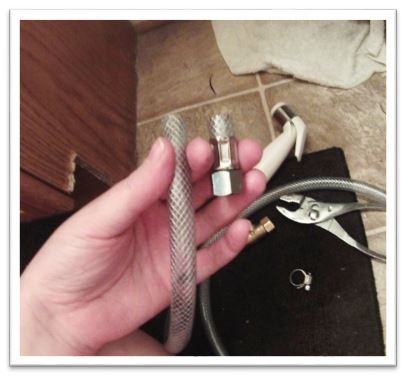
Put your clamp ring over the hose, then force the hose down over the ¼” output on your adapter. It
takes a bit of wiggling, but once you get it down over it should slide down pretty easily.

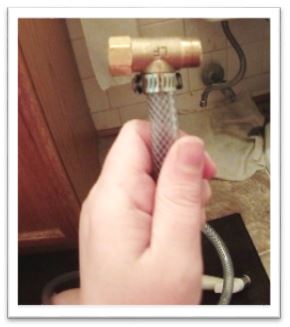
Now slide up the clamp and tighten it. I used the pliers I had on hand because I was too lazy to find a
screwdriver, but you could use one of those to tighten the clamp too. Now your sprayer is assembled
and ready to be attached!
Now, again double checking your water is turned off, disconnect the hose that runs into your toilet tank
from the wall. Ours was a little corroded and took some elbow grease, but we finally got it off. (Please
ignore how dirty the wall looks!)
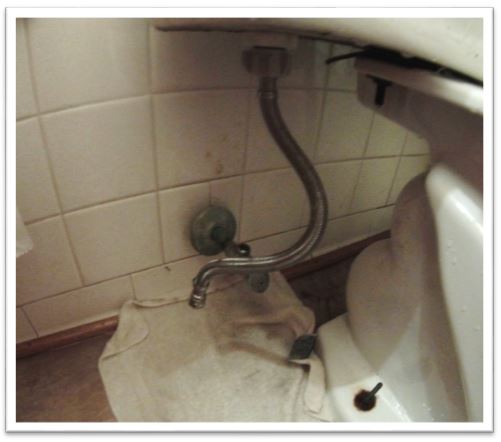
We’re in the home stretch! Now just attach the adapter to both the hose and the pipe and VIOLA!
You’re set! Here’s what ours looked like all set up and finished!

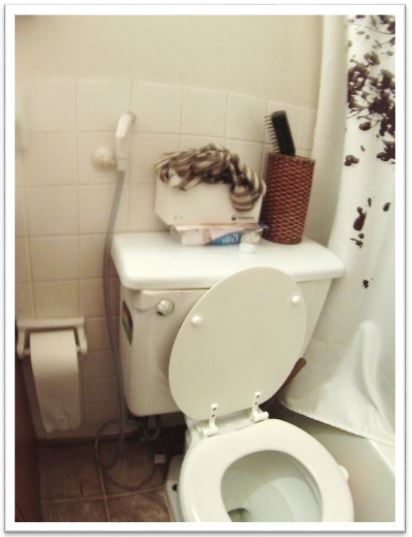
Pretty neat, huh?! I hung the sprayer itself on
An old suction hook we had laying around, and
I couldn’t be more thrilled!
So there you are! A 20$, ten minute diaper sprayer that keeps your cloth diapers clean and your hands
out of the toilet! I hope you enjoyed it, I know we are!